Sunday, May 30, 2021

Revisiting Victorville's Wye, and Building More Lower Deck Frames

It's time to revisit the wye area of Victorville, and then we'll see more progress on building the final frames for the layout's lower deck sections.

The wye for turning steam loco helpers was at the railroad east (compass northwest) end of town.  Servicing helpers and turning them on the wye was a major function of Victorville, as far as the railroad was concerned. 

Here's a view of the wye area, as shot by Fletcher Swan in the late 1940s:

One leg of the wye curves off to the left, and the crew building, called the boiler house, is inside the wye (it had been the Hesperia depot before WW2).  Helpers are waiting at the right of the boiler house, and the local switcher is parked to the left of the building.  An elevated fuel tank can be seen behind the boiler house.

Here's a good aerial view of the whole scene from about 1945:

You can see the curving tracks of the wye in the center and lower right parts of the photo, with the tail of the wye going off the lower left corner.  Inside the wye on the right, there was the boiler house, the elevated fuel oil tank, and a sand house.  To the left of the wye we see the warehouse and tanks of the Union Oil distributor.  Note that D Street (Route 66) crossed both legs of the wye. 

Here is the part of my track plan for this area:

The tail of the wye will fold down out of the way when not being used, with the hinge along the edge of D Street.  Note the Union Oil warehouse and tanks and spur track to the left of the wye, and the boiler house, fuel tank, and sand house inside the wye, between the switcher spur and the Santa Fe and Union Pacific helper waiting tracks.  Near the tail of the wye was a trailer park (also visible in the aerial photo above).

Here's a view showing the local switcher, a Santa Fe 2-8-0, on the switcher spur before the buildings were painted yellow (the sand house is behind the tender):


Here's a view of a UP 2-10-2 helper waiting on the other side of the boiler house in 1951, as shot by Jack Pfeifer:


And here's a view of a Santa Fe FM H16-44, serving as the local switcher, parked beside the boiler house, as shot by Stan Kistler in 1951:

 
Near the wye was a spur track into the Union Oil distributor, as seen from trackside circa 1940:


Finally, here is Wayne Lawson's N-scale model of the wye area:

The tail of the wye is in the right foreground, Union Oil is at the left edge, and the boiler house is inside the wye.

Now let's turn to the progress on my layout.  Last time I had finished the frame for Section 5 of the lower deck, so I continued in sequence around the room.  Here is Section 4's frame on the floor (it's a small but odd-shaped section):


Then I cut more boards and assembled Section 3's frame, as seen here:


Starting with Section 3, I decided that my joists should be no more 24" apart, so there are more joists in this section than in some of the previous ones.  I plan to go back and correct the joist spacing in most of the previous sections next week.

Then I assembled the frame for Section 2, a large section, as seen here:

When I came to the final section, Section 1, I posed for this photo while assembling its frame:


And here is Section 1's frame on the floor:

To the left of Section 1 is Section 7, where the joists are too far apart, so that is one of the frames I plan to correct in the coming week, by moving the middle joist and adding a second one in there.

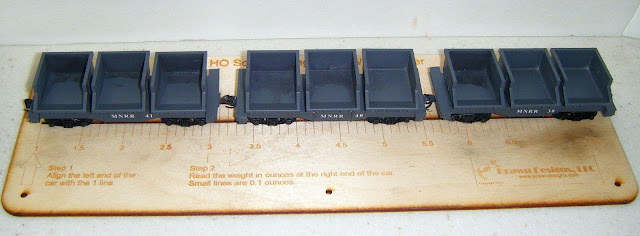
Besides my ongoing benchwork project, local friends Bill Messecar and Don Hubbard have been working hard to build a fleet of 14 Mojave Northern side-dump rock cars for my future cement plant and quarry operations.  

They use the bodies of old MDC 30' flat cars as the base, fill the bolster holes for new Andrews trucks, add support beams under the rock bins (or "skips"), and add three 3D-printed rock bins to each car.  Bill paints them and decals them.  The skips and decals were designed and ordered by my friend Jim Coady.

 Don Hubbard recently sent me this photo of three of the rock cars:


 Many thanks to Bill and Don and Jim for all their help with this very big project!


Monday, May 17, 2021

Revisiting Victorville's Barrio, and Building More Layout Section Frames

This time we'll revisit the part of the barrio in Victorville that I plan to model, and then we'll look at more progress in building frames for more of the plywood sections for the lower deck.

The first street on the far side of the tracks from downtown Victorville was E Street, which was the street that led to the big cement plant just outside the town.  Many Hispanic and Black cement plant workers and their families lived along and near E Street, in the neighborhood they called the barrio.

We can only get glimpses of the former buildings there in the backgrounds of various photos and in some old aerial photos.  A color photo we saw last time, shot by Chard Walker in 1950, shows UP's early double-ended gas turbine #50 during a test run there:

To the right of the loco we can see two important structures that I plan to model -- the scalloped facade of a Spanish-style meeting hall that became a church, and several propane tanks on the grounds of a propane dealer.

The church building is long gone, but the church community still exists in the Victorville area, so I contacted them and got a scan of an old close-up of the building's facade:


This was the Emmanuel Temple CME church (the painter misspelled the name, so I'll do that too when I model it).

Let's look at my track plan for the barrio area on my layout:


Notice E Street running through the area, with the church located between 3rd and 4th Streets.  Across the street from the church was the propane dealer, named the Southwest Gas Corporation, which was apparently served by tank cars parked there on the outfit spur for unloading.

Here's a 1940 aerial view of this area:

The mainlines and sidings and spurs are on the left, and just to the right of there, at the bottom of the photo, is the propane dealer, with a row of shade trees on the far side.  

From left to right on the property, there's a very small building that may be a pump house, then the office building, then three small propane tanks in a row, before we come to E Street.  By 1950 they had added a fourth, larger propane tank near the street, as is visible in the UP gas turbine photo, in front of the church in that photo.

In the aerial photo above, we can also see the church, which has the long, white roof across the street from the propane dealer.

Here's a partial view of this area in the background of a 1946 photo:

The three smaller propane tanks are very visible here.  And this brings us to the third landmark building of this area, which was the second-hand store visible behind the tanks (and across the street).  My track plan above shows the store at the corner of 4th and E Streets.  During most of the postwar decade, this store was named Carr's Furniture, according to the old phone books.

Here's a circa-1945 aerial photo showing this area from another angle:

The second-hand store (Carr's Furniture) is very visible near the right edge, and the CME Church with the scalloped facade is very visible near the left edge.  The propane dealer is across the street from the church, hidden among the shade trees, but a couple of the small propane tanks can be seen if you look closely.  The other buildings along E Street were the homes of the residents there.

The Southwest Gas Corporation had their headquarters in Barstow, as can be seen in this old photo from their history website:

I could include a sign board similar to this at my Victorville plant.

As for the homes in the barrio, many of them are still there and visible from Google's Street View:


I plan to model these using available kits for cabins and company houses, such as this Blair Line company house:


This concludes our second visit to the barrio part of my future layout.  Now let's look at a little more progress I've made with my lower deck benchwork.

Last time I had mounted the frame of Section 8 up on legs and was about to attach the legs, but then I realized that some of the legs would end up in the middle of the lower deck staging tracks, so I needed to finally draw an exact plan for the staging mainlines and yards on the lower deck before proceeding with the legs.

But I didn't feel like track planning, as I was enjoying the benchwork, so I just kept on building more frames for more plywood sections.  The next one to build after Section 8 was Section 7, and we can see the frame of Section 7 on top of its plywood shape on the floor here (with Section 8 on temporary legs behind it):


Then came the smaller Section 6A (clamped to Section 7):

Onward to the larger Section 6's frame:


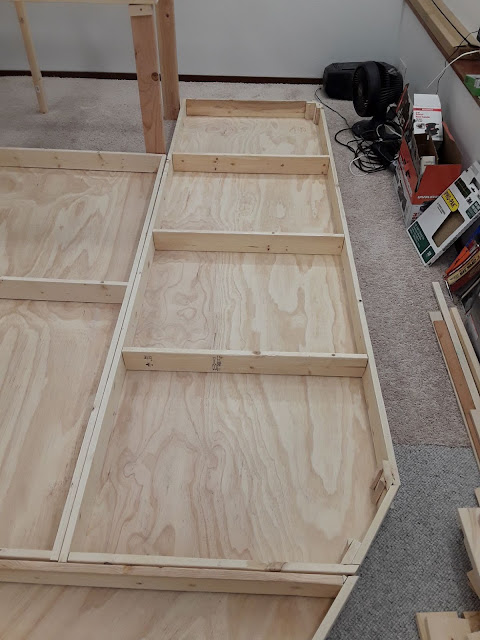
And here is the most recent one I've completed, the even larger Section 5 (butting up against Section 6 behind it):


I ran out of 1x4s, so I had to bring another 22 boards home, which you can see stacked on the floor next to Sections 5 and 6.

The many odd angles where the edge boards meet in the frames are a pain to connect.  I use short connector boards (cut at odd angles) and screw into them from both of the side boards, as you can see at the far end in this opposite view of Section 5:


I think I'll continue to postpone the track planning for the lower deck staging yards and keep on building more of these frames, while I'm on a roll.


Monday, May 3, 2021

Revisiting Victorville's Section Houses and Water Tanks, and Building a Frame for Section 8

In this bi-weekly installment we'll revisit the Victorville scene where the section houses and water tanks were, and then we'll look at my recent layout progress in completing the plywood sections and building the frame for Section 8.

I try to find new photos to use when we revisit a scene, but it's hard to top this one from last time, showing a Santa Fe 2-10-2 passing the section houses and water tanks, as shot by Chard Walker:

We can see the two black, steel water tanks, with the section foreman's house in front of the tanks and one of three pump houses with a wooden derrick on top just to the left of there.  There was a 2nd section house just beyond the one we can see.

Here's part of a map from the Santa Fe's Water Service Records for Victorville:

Note the two water tanks in the lower right, the Section House and Pumper's Quarters (later it was the Section Foreman's House) adjacent to the tanks, and the three Wells (pumphouses) above there.

Here's the part of my track plan where I will model this area (looking from the other direction):

Just below the two section houses, the three squares in a row are the pump houses.  To the left of the section houses there was a long bunkhouse for the local track gang, and across the tracks there were two old carbodies by the caboose track; the one on the right was an old passenger car, and the one on the left was an old boxcar. 

My friend Wayne Lawson has modeled much of this area in N scale.  Here is a general view of his scene with the water tanks and pump houses:

In the foreground are two pumphouses (maybe he's skipping the 3rd one) and by the backdrop are two water tanks (only one has been painted so far).  In front of the water tanks are two paper foundations showing where the two section houses will go.  On the left is a mock-up of the long bunkhouse he plans to build.  The 6th Street grade crossing is on the right (it's the only grade crossing in town).

Here's another view of this scene, looking from above 6th Street:

As you can see, there were various other carbodies and tool houses in the area.  The paper foundations for the two section houses are more visible in this view.

Right across the tracks from here, Wayne has modeled the two carbodies that were used by the swing brakemen who rode the trains over Cajon Pass:

As you can see, one was an old passenger carbody and one was an old boxcar carbody.  The area with the water tanks and pumphouses is in the background, and in the far right distance we can see part of the old Santa Fe hotel that we visited last time.

If we zoom in on a color slide of this area, we can see these two carbodies on the right edge of the photo:

The Victorville depot is in the background, across 6th Street, with the two carbodies in the right foreground. 

Let's turn now to recent progress on the lower deck of my layout (the staging deck).  

There were gaps between some of the plywood sections I had laid out on the floor, so I cut out a new Section 6A to fit between Sections 6 and 7, and I bought a new 4x8' sheet of plywood and cut out a new Section 8 from that.  All the sections now fit together very well on the floor, and I was excited to see them all in their future locations, so I shot four photos from various viewpoints.

This first view is looking out from the corner of the alcove, across Sections 1, 7, and 8:

The existing Section 9 (with roadbed) is in the upper right, with the new Section 8 adjacent to it.  Section 7 is to the left of 8, and that's where the Lower Narrows would be on the upper deck.  In the foreground is Section 1, where the Upper Narrows would be.  The other sections curve around the room in the distance. 

This next view is from the laundry room, looking in the opposite direction at Sections 4, 5, and 6:

Section 5 is in the foreground, and that's where most of the cement plant will go on the upper deck.  To its right is Section 4, which has the four-track curve coming out of Victorville.  Beyond Section 5 on the left is Section 6, which has the throat tracks into the cement plant.  It touches the post on the left.  The center of the lower deck is left open for pop-up scenery hatches that will be on the upper deck there.

Here's a view of Section 6 in the foreground and Section 6A just beyond it:

Section 6 is where the throat tracks into the cement plant will be on the upper deck, and the smaller 6A behind it (and against the other post) is leading into the Lower Narrows scene.  I stuck some pieces of masking tape on the floor to mark the aisle edges and the corners of each plywood piece.

This final view is looking back into the alcove, where the entrance to the staging room is located:

Section 6A is behind the post, with the large Section 2 to its right and part of Section 3 in the foreground.  Sections 2 and 3 will hold the central Victorville scene on the upper deck.  Sections 8, 7, and 1, from left to right, are in the distance.

But all of this plywood is only for the lower deck, where as many staging tracks as possible will be located.  A large helix in the staging room will connect the two decks.  I'll have to cut out the same plywood shapes for the upper deck someday.

After all the plywood sections were cut to fit, I began to build a frame to support Section 8, the first section after we leave the staging room.  I cut some 1x4s to fit along the plywood's edges, then clamped, drilled, and screwed them together.  I made a new work table to do this work on, using the large plywood sheet of Section 2 as the tabletop.

When the frame for Section 8 was done, I shot this photo, with many of the tools in the foreground:


The next step was to make legs for the frame.  I cut four 2x4 legs for the corners and three 2x2 legs for the middle.  I added a support block partway up each leg to support the lower deck, and I added an adjustable footpad under each leg.

I clamped the legs to the frame, stood the assembly on its legs, and posed for a photo with the new Section 8 in its final location adjacent to the existing Section 9:


The next steps will be to screw the legs into the frame and then cut notches into the edges of the plywood tabletop to allow the legs to pass through.  Then I hope to repeat the whole process with Section 7, as I work my way around the room.