Sunday, April 17, 2022

UP's H20-44 Diesels in Victorville, and Finishing the Mainline Cork Roadbed

This time we'll cover the UP's Fairbanks-Morse H20-44 diesel helpers in Victorville, and then we'll look at my progress in finishing the cork roadbed around the mainlines of the staging deck.

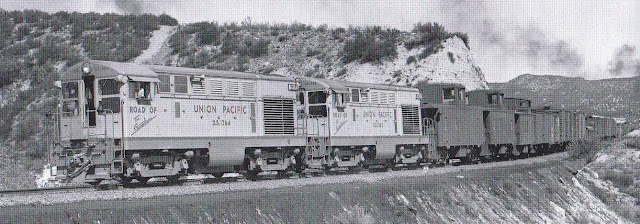
In August of 1947 the UP brought in five new FM H20-44 diesels, #1360-1364, to start replacing their steam loco helpers on Cajon Pass.  In Nov-Dec. of 1947 they brought in six more, #1365-1370, to complete the replacement of their steam helpers (until the return of UP steam in 1950-51, that is).

Here's a great photo of #1360 waiting near the water tanks in Victorville in Nov. 1947 to help the next westbound freight, thanks to Jack Whitmeyer:


Here's a beautiful shot of #1360 helping the eastbound Los Angeles Limited around Sullivan's Curve in June of 1950, thanks again to Jack Whitmeyer:


Here's a UP company photo of #1363 about to help a freight:


Back in Victorville, here's a Stan Kistler photo of new #1361 in Sep. of 1947:


Here we see #1360 and an FA unit pushing a freight up Cajon Pass, as shot by Chard Walker:


Here's a Donald Duke shot of #1364 and #1361 pushing another freight up Cajon Pass in the summer of 1948:


Here we see #1360 and a partner returning light to San Bernardino (along with some Santa Fe FT helpers) while an eastbound Santa Fe steam loco works upgrade out of town, thanks to Chard Walker:


Besides serving as helpers, the H20-44s also pulled the UP's Leon Turn local freight to the cement plants at Victorville and Oro Grande.  Here is #1365 with its caboose at Summit in Jan. 1949, heading to Victorville to pick up some loads, as shot by Chard Walker:


But these units were not great as helpers, so in mid-1950 the UP replaced them all by bringing back some steam locos again.  So the lifetime of these units on Cajon Pass ran from mid-1947 to mid-1950.

As for HO models, I only know of the old Alco Models brass model, as seen here after being painted:

I have two of these that have been painted, and recently I found a third one.

Now let's look at my layout progress.  I worked an hour or two each day, gluing down cork roadbed along the double-track mainlines all the way around the edges of the lower deck, until the loop was complete.

Here's the new roadbed as it curves through Sections 4 and 5, along with some tools of the trade:


 Moving along, here's the next roadbed,
running through Sections 5 and 6:


And the final leg of the course, running through Sections 6, 6A, and back to Section 2 in the distance:

A couple of sheets of Midwest cork are laid beside the mainlines, to give some idea of where they will support all the turnouts into the A Yard in this area.

The next steps were to complete the cork wedges at the turnouts in Section 2, and then to lay out and mark the future turnout locations in Sections 6 and 6A:

In the lower right are two of the twelve Midwest cork squares (12x12") that I bought to supplement the four large sheets (all 5 mm thick).  

But all the rest of my larger cork sheets came from a carpet store and are 6 mm thick, so I began planning where the 5-mm cork should end (after supporting the turnouts) and the 6-mm cork should begin (where there are no more turnouts, just storage tracks).  The transition will be sanded down.

Here's a drawing I made to mark the turnout locations and the boundaries of the 5-mm cork sections:

As you can see, they are basically triangle-shaped areas around the turnouts.

I began work on making these by cutting out the triangular cork area that supports three turnouts into the A Yard at the top of this drawing.  I also laid cork roadbed around the curve of track A1 between that area and the next cork area to the right of there in the drawing.

Here is what this first sheet cork area looks like so far, but the triangular sheet with three turnouts has not been glued down yet, and the two sheets of carpet cork to the right have not been glued down either:


So, my next steps are to continue cutting and fitting all the cork sheets for the main yards, and then to paint all the cork in two shades of gray, with lighter gray on the mainlines, as I did in the staging room over a year ago.


Sunday, April 3, 2022

Santa Fe's DT6-6-2000 Diesels in Victorville, and Laying More Cork Roadbed

Our Victorville locomotives this time are Santa Fe's Baldwin Centercab DT6-6-2000 diesels, and my layout progress report will look at more cork roadbed being laid on the staging deck.  

Santa Fe bought seven of the big Baldwin centercabs from mid-1948 through early 1950, numbered 2600-2606.  But only two of them are known to have worked as helpers on Cajon Pass: 

#2600 from delivery in June, 1948, until sometime in 1949 or 1950, when it  began pulling transfer runs to the Los Angeles harbor until 1956; and

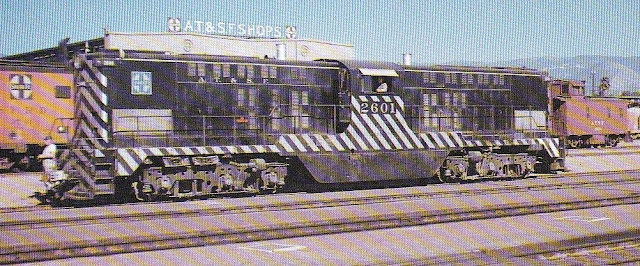
#2601 (bought in August, 1949) starting from about mid-1950, when it pulled coal loads from San Bernardino to the Kaiser Steel plant in Fontana on weekdays and served as a helper on Cajon Pass on the weekends (according to Chard Walker).

Here's a G.M. Best photo of #2600 when new (July, 1948), in Los Angeles:

At this time the zebra stripes were limited to the frame (until 1950).

Here's a rare photo from the collection of David Lustig showing #2600 in helper service at Summit, about to run light back to San Bernardino:


Since Cajon Pass helper service involved helping trains out of Victorville too, we can assume that they were also seen in Victorville, although no photos of them there have turned up.

Sometime in 1949 or 1950 #2600 finished its Cajon Pass assignment and moved to the Harbor District, along with #2602.  Then #2601 showed up in San Bernardino to pull loads of coal from San Bernardino west to Fontana on weekdays, and to help trains over Cajon Pass on weekends.

Here's a color photo by Jack Whitmeyer of #2601 at San Bernardino in Jan. 1953:

Note that the zebra stripes now include the side of the cab, but not yet the lower part of the frame.

Jack whitmeyer also shot #2601 and its crew in San Bernardino in April of 1952:


 And then again in July of 1952, with its caboose:

In 1956 the 2600s were transferred east.  Here is our #2601 at Argentine in Nov. 1956:

Note that its zebra stripes now extend down to the lower part of the frame.  The upper part of its side walkway is still short, but most or all of these locos got a higher walkway later in life (perhaps to strengthen their frames).

As for HO models, I have one of the expensive, painted models that Division Point produced years ago, like this one:


They also made some with the later zebra stripes and the longer upper walkway:


Now let's take a look at my layout progress, which involved gluing down a lot more cork roadbed with DAP Alex Plus caulk.  It's the turnout areas that take a lot of the time, as wedge-shaped pieces of cork have to be cut to fill in where the two roadbeds come together.

Here's a view of the new roadbeds leaving Section 8 and curving farther into Section 1:

Note the small Dustbuster vacuum in the left corner, which is very useful in cleaning up all the cork bits after I sand the rough edges off the cork.

This next photo shows the tangle of turnouts near the edge of Section 1, including the turnout to the future helix track at the lower left:


Now we look back at this Section 1 area from Section 2:


A week later, things are still moving along, day by day.  Here's a view looking from Section 1 toward Section 2, where the roadbed for some mainline crossovers has now been laid:

Also, note that I've begun cutting and setting in some sheet cork that will support the ladder tracks that run beside the mainline, and note the ladder turnouts that are being temporarily located on the sheet cork.

Here's a closer view of this area on Section 2, with two double-slip switches also visible in the foreground:


Finally, we'll look at the advancing mainline roadbeds, as they now
flow through Section 3 and curve into Section 4 in the foreground:

The black box behind the Dustbuster is my CD player, for listening to my 1950s rock & roll CDs while I work!  Next week I may be able to complete the mainline cork all the way around the edges of the layout, until I meet the final tangle of turnouts on Section 7.

Meanwhile, I've been discussing ideas with Jim Coady for how to cut and build the Rainbow Bridge pieces, including maybe using a Cricut Maker cutting machine and/or a 3D printer, which my library has available for public use.  Here are some recent ideas for making the bridge parts, thanks to Jim Coady:


I'll be back with more locos and more cork roadbed in a couple of weeks.